最佳实践 | 基于注解处理器实现视图绑定
上篇文章我们详细介绍了注解处理器的相关功能,不过即使看完也完全不知道注解处理器到底要怎么写。
注解处理器本身是个实践性十分强的概念,本篇文章将会从0到1编写一个Kotlin注解处理器(KAPT)实现Android中的视图绑定功能,在这之前,先来介绍一些能够协助我们快速开发的开源库。
注:源码链接放置在文末。
开源库推荐
先推荐几个开源库:AutoService、JavaPoet、KotlinPoet。
AutoService
在上篇文章中讲到自定义的注解处理器要正常运作的话,需要对其进行注册,具体是需要在resources/META-INF/services下新建javax.annotation.processing.Processor文件并将注解处理器的全限定名写入文件中。

这是Java中非常常见的ServiceLoader使用方式,需要我们创建的文件称为ServiceLoader的配置文件(configuration),这种方式在很多框架的源码中都有使用。
不过这种方式略微繁琐,考虑一个问题,既然是生成文件的话,我们的APT刚好就可以实现,那么是否可以由注解处理器来自动生成这个文件呢?
答案是可以的,而且已经有很多人这样在做了。谷歌就写了一个开源库叫auto,其中的AutoService就可以帮助我们生成这个文件,源码非常精简,有兴趣可以看看。
有了AutoService之后,只需要一个注解就可以解决注解处理器的注册问题了:
1 | |
这里有一点需要注意,就是在引入AutoService依赖时,如果我们编写的是KAPT的话,需要以同时以implementation和kapt的方式引入AutoService:
1 | |
JavaPoet
APT中我们可以使用Filer来创建生成Java源文件:
1 | |
然而这种方式我们只能通过字符串硬编码的方式来写入代码,对于程序员来说非常不友好,如果代码比较多很容易出现错误而找不到问题的情况。
因此Square开发了JavaPoet,JavaPoet提供了一套用于生成.java文件的API,其使用方法可以参照其Github页面的Readme,使用它我们可以按照程序员的方式去编写源代码并输出到文件中。
比较有意思的是,AutoService正是使用了JavaPoet来生成System Loader的配置文件。
KotlinPoet
与JavaPoet类似,KotlinPoet用于生成.kt源码文件。
详细的使用方法参照官方文档:https://square.github.io/kotlinpoet/。
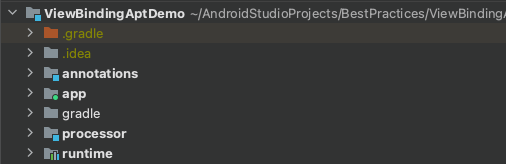
项目结构
首先来搭建整个Demo的项目结构,一般情况下我们会创建两个Java/Kotlin Module,命名为annotations和processor,其中annotations存放所有的注解,processor则为注解处理器模块。
另外添加了一个名为runtime的Android Module,存放框架的所有对外开放类,整个源码目录如下。
下面分别来介绍这些模块。
annotations
annotations模块中定义了我们所需要处理的注解,此Demo中我们需要定义两个注解:
BindClass:使用此注解标注的类我们才会去收集需要注入的View并声称对应的管理类。
1
2
3@Target(AnnotationTarget.CLASS)
@Retention(AnnotationRetention.BINARY)
annotation class BindClassBindView:使用此注解标注的View才会进行依赖注入。
1
2
3@Target(AnnotationTarget.FIELD)
@Retention(AnnotationRetention.BINARY)
annotation class BindView(val redId: Int)
processor
processor属于核心模块,注解处理器在这里定义。模块目录结构如下所示:
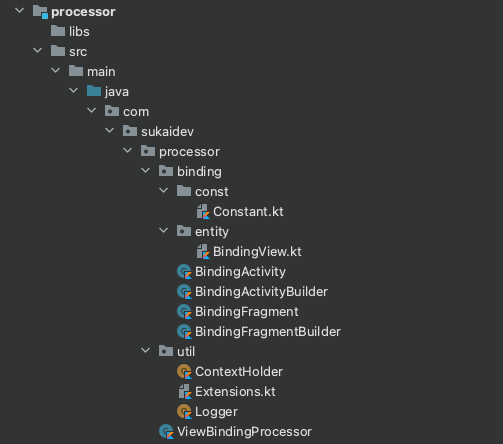
主要的逻辑在VIewBindingProcessor中,其它类都用于协助注解处理器。
VIewBindingProcessor要做的事情很简单,分为三步:
收集所有标注了@BindClass的Activity/Fragment:
1
2
3
4
5
6
7
8
9
10
11
12
13
14
15
16
17
18
19
20
21val activityType = elements.getTypeElement(ACTIVITY_JVM_CLASS_NAME).asType()
val fragmentType = elements.getTypeElement(FRAGMENT_JVM_CLASS_NAME).asType()
roundEnv.getElementsAnnotatedWith(BindClass::class.java)
.filter { it.kind.isClass }
.forEach {
try {
when {
it.asType().isSubType(activityType, types) -> {
bindingActivities[it] = BindingActivity(it as TypeElement)
}
it.asType().isSubType(fragmentType, types) -> {
bindingFragments[it] = BindingFragment(it as TypeElement)
}
else -> {
Logger.error(it, "Unsupported typeElement:${it.simpleName}")
}
}
} catch (e: Exception) {
Logger.logParsingError(it, BindClass::class.java, e)
}
}收集所有标注了@BindView的View:
1
2
3
4
5
6
7
8
9
10
11
12
13
14
15
16
17
18
19
20val viewType = elements.getTypeElement(VIEW_JVM_CLASS_NAME).asType()
roundEnv.getElementsAnnotatedWith(BindView::class.java)
.filter { it.kind.isField }
.forEach {
try {
// 必须是View的子类
if (it.isSubType(viewType, types)) {
if (it.enclosingElement.isSubType(activityType, types)) {
bindingActivities[it.enclosingElement]?.bindingViews?.add(BindingView(it as Symbol.VarSymbol))
?: Logger.error(it, "BindingView $it annotated as @BindView while ${it.enclosingElement} not annotated.")
}
if (it.enclosingElement.isSubType(fragmentType, types)) {
bindingFragments[it.enclosingElement]?.bindingViews?.add(BindingView(it as Symbol.VarSymbol))
?: Logger.error(it, "BindingView $it annotated as @BindView while ${it.enclosingElement} not annotated.")
}
}
} catch (e: Exception) {
Logger.logParsingError(it, BindView::class.java, e)
}
}为Activity/Fragment生成对应ViewBinding类:
1
2
3
4
5
6bindingActivities.values.forEach {
it.builder.build()
}
bindingFragments.values.forEach {
it.builder.build()
}
BindingActivityBuilder和BindingFragmentBuilder分别用于构造生成类的源码以及输出生成类,主要就是使用KotlinPoet构建整类的变量和方法,具体的代码参考文章底部的源码路径。
生成类演示:
1 | |
在编写注解处理器时,最好是先把要生成的代码写出来,然后对照这个代码使用KotlinPoet进行代码生成。
runtime
runtime模块主要是提供一个门面类:ViewBinding。此类负责注册Activity和Fragment的LifecycleCallback,方便在Activity和Fragment销毁时自动进行视图解绑,防止出现内存泄露问题。
ViewBinding类的代码如下:
1 | |
其中init方法需要在Application创建时调用,因此这里使用了ContentProvider来初始化ViewBinding类。
1 | |
源码地址
Github地址,需科学:源码地址
本博客所有文章除特别声明外,均采用 CC BY-SA 4.0 协议 ,转载请注明出处!